
Why Proper Irrigation Installation Can Save Your Property Thousands
Irrigation installation is one of the most impactful investments a property owner or HOA manager can make — and one of the easiest to get wrong.
Here’s a quick snapshot of what you need to know:
| Topic | Key Fact |
|---|---|
| Water waste | Up to 50% of outdoor water is wasted by inefficient irrigation |
| Daily U.S. usage | Nearly 9 billion gallons used for landscape irrigation every day |
| Drip vs. sprinkler | Drip systems use up to 50% less water than traditional sprinklers |
| Smart controllers | Can save a couple hundred gallons of water per day |
| Professional install cost | Typically ranges from $3,000 to $8,000 for residential systems |
| DIY drip system cost | As low as $75 for a basic garden setup |
| Installation time | 1 to 4 days depending on property size and complexity |
Whether you’re managing a multi-zone HOA property or a single-family landscape in Southern California, getting the system design, components, and installation right from the start saves money, prevents damage, and keeps your property looking its best year-round.
A poorly planned system doesn’t just waste water — it creates dry patches, overwatered turf, and costly repairs down the road.
I’m Troy Basmajian, President of Southern California Tree & Landscape, and over the past decade I’ve overseen hundreds of irrigation installation projects across commercial, residential, and HOA properties throughout Southern California. In this guide, I’ll walk you through everything you need to make a confident, informed decision.
Key Types of Systems for Your Irrigation Installation
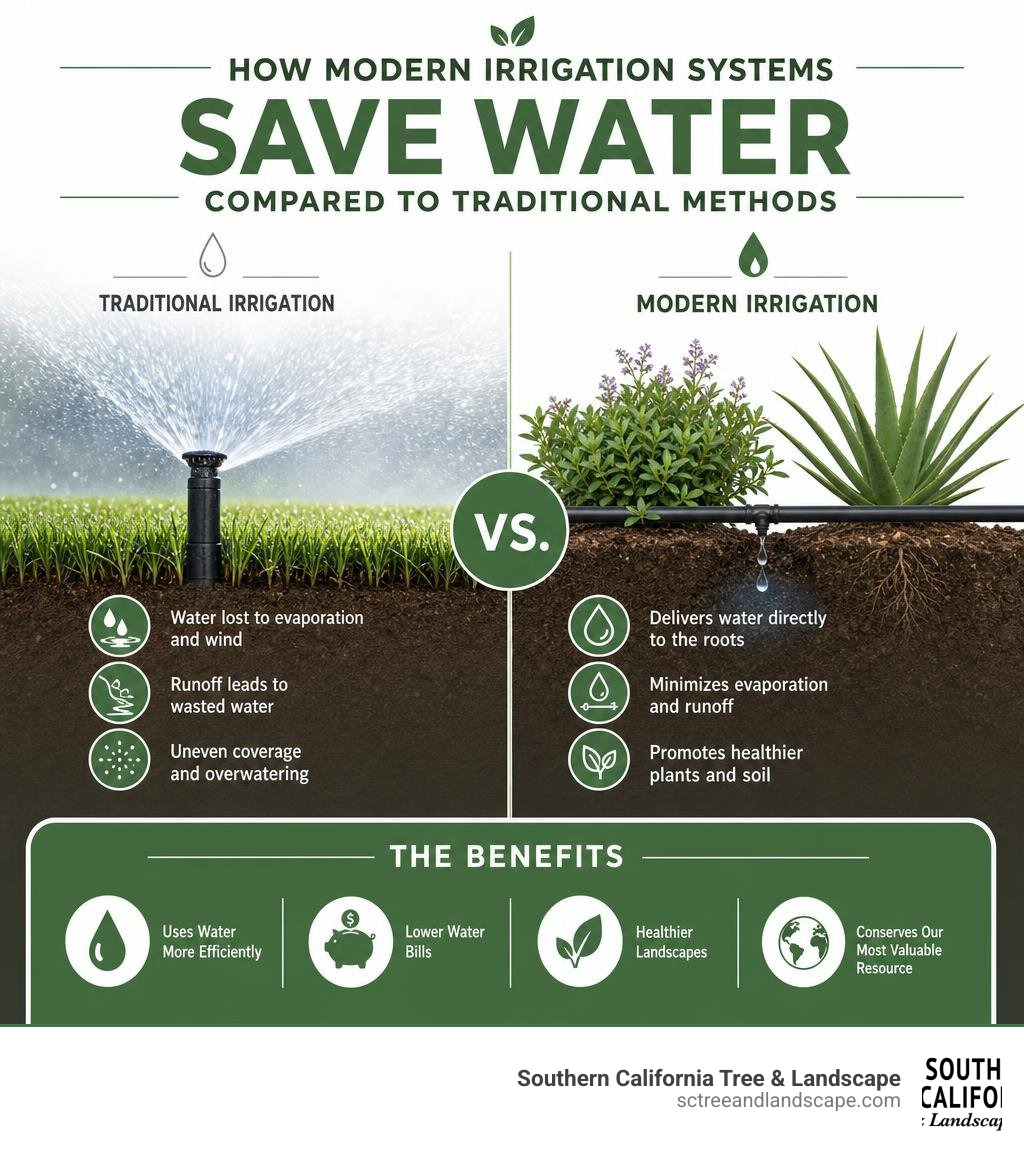
When deciding on an irrigation installation, the first choice you must make is the type of system that best fits your landscape. Not all plants drink water the same way. A wide, sweeping lawn of turf grass has entirely different watering needs than a bed of native California shrubs or a backyard vegetable patch.
Choosing the wrong system type leads to massive runoff, fungal diseases, and astronomical water bills. To help you visualize the differences, we have broken down the two primary styles of systems below:
| Feature | Traditional Sprinkler Systems | Drip Irrigation Systems |
|---|---|---|
| Best Suited For | Large turf lawns, ground covers, sports fields | Flower beds, shrubs, trees, container plants, vegetable gardens |
| Water Efficiency | Moderate (subject to wind drift and evaporation) | Extremely high (up to 50% more efficient than sprinklers) |
| Delivery Method | Overhead spray or rotating streams | Direct-to-root slow drip emitters |
| Operating Pressure | High pressure (typically 40 to 65 PSI) | Low pressure (typically 15 to 30 PSI) |
| Installation Complexity | High (requires deep trenching and extensive pipe runs) | Low to Moderate (flexible tubing, can be pinned above ground or shallow buried) |
Traditional Sprinkler Systems for Turf Grass
For large expanses of green grass, traditional sprinkler systems remain the industry standard. These systems utilize pop-up sprinkler heads that rise above the grass line when water pressure is applied and retract completely below ground level when the cycle is finished. This retraction is vital because it keeps the heads safely out of the way of lawnmowers and active foot traffic.
To design these systems correctly, we must select the right sprinkler heads. Fixed spray heads work beautifully for smaller, tight lawn areas because they throw a continuous sheet of water over a radius of 5 to 15 feet. For larger expanses, rotating stream rotors are preferred. Rotors slowly sweep back and forth, throwing water anywhere from 25 to 50 feet.
The golden rule of traditional sprinkler layouts is achieving uniform coverage. If your layout does not feature proper head-to-head spacing, you will end up with frustrating brown patches. If you are ready to stop dragging hoses around every weekend, you can read more about how we design and build these setups in our guide: Stop Hosing Around and Start Automatic Sprinkler System Installation.
Drip Irrigation Systems for Gardens and Beds
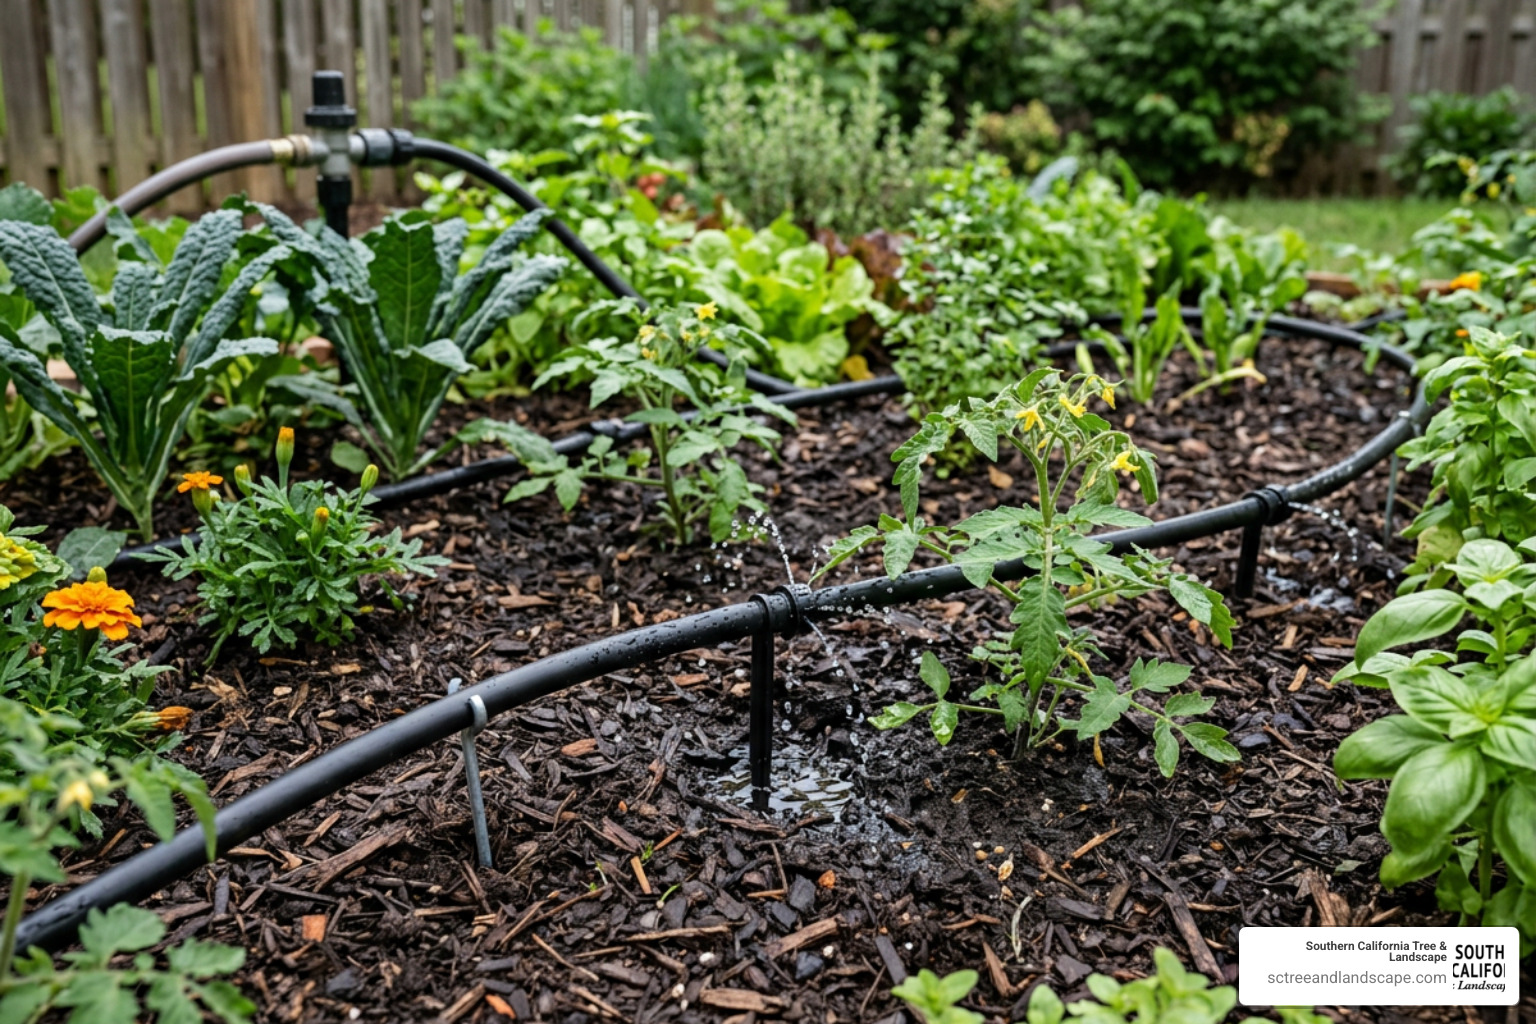
If traditional sprinklers are the heavy artillery of watering, drip irrigation is the precision sniper. Drip systems deliver water directly to the root zones of your plants through a network of flexible, low-pressure hoses and specialized emitters. Because water is applied slowly and directly to the soil, evaporation and wind drift are virtually eliminated. This precise delivery explains why drip systems are celebrated for using up to 50% less water than traditional sprinklers.
A standard drip irrigation layout starts at your outdoor spigot or a dedicated zone valve. From there, a main line of 1/2-inch polyethylene tubing winds its way through your garden beds. Near the base of each individual plant, we punch a hole into the main line and attach a 1/4-inch distribution line ending in a drip emitter. These emitters are rated in Gallons Per Hour (GPH), with common rates of 0.5 GPH, 1 GPH, or 2 GPH.
For dense plantings or vegetable rows, we often use pre-installed inline emitter tubing, which features built-in drip points spaced every 12 inches. Over time, even the best-designed drip lines can face challenges from garden tools, soil settling, or mineral buildup. To keep your garden flourishing without a hitch, check out our troubleshooting tips: Stop the Leak and Save Your Garden with Easy Drip Repair.
Planning and Designing an Efficient System
A great irrigation installation is 90% planning and 10% digging. If you skip the engineering phase, you will end up with a system that has weak water pressure, dry zones, and expensive structural issues.
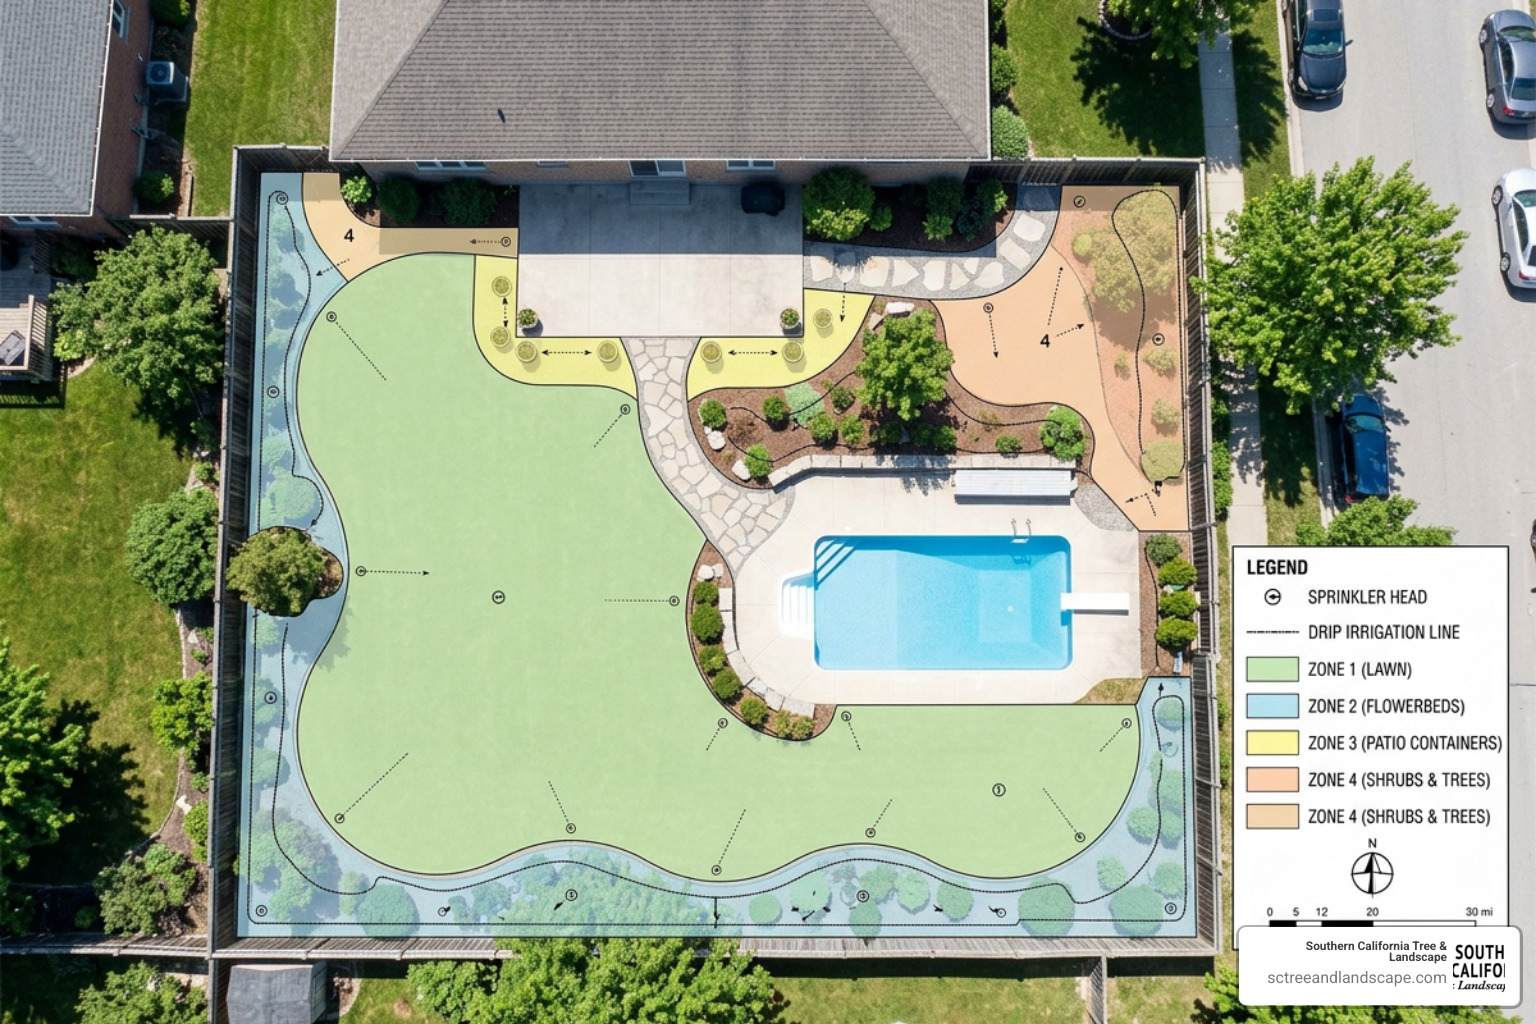
Before buying a single length of pipe, you must outline your yard’s physical dimensions and calculate your home’s hydraulic limits. For a complete look at professional design standards, you can refer to this comprehensive PLANNING & INSTALLATION GUIDE .
Measuring Water Pressure and Flow Rate
Your home’s water supply has physical limits. To design a system that operates correctly, you need to know two fundamental numbers: static water pressure (measured in PSI) and flow rate (measured in GPM, or Gallons Per Minute).
- Measure Static Pressure: Screw a standard pressure gauge onto your outdoor spigot. Ensure all other water sources inside and outside the house are completely turned off. Open the spigot fully and record the reading. For a standard residential system to operate correctly, you generally want to see between 40 and 65 PSI.
- Determine Water Meter and Service Line Size: Check your utility bill or look at the physical meter itself. Most residential meters are 5/8-inch, 3/4-inch, or 1-inch. Next, measure the outside diameter of the pipe running from the street to your home (the service line) to determine its size.
Perform the Bucket Test: If you want a quick, real-world measurement of your flow rate, grab a 5-gallon bucket. Turn the spigot on all the way and time how many seconds it takes to fill the bucket to the brim. Use this simple equation:
$$\text{Flow Rate (GPM)} = \left( \frac{\text{Bucket Size in Gallons}}{\text{Fill Time in Seconds}} \right) \times 60 \times 0.8$$
(Note: We multiply by 0.8 as a safety margin to ensure we do not plan a system that pushes your plumbing to its absolute maximum capacity).
Mapping Zones and Head-to-Head Coverage
Once you know your total available GPM, you can determine how many separate watering zones your property requires. You cannot run every sprinkler head at the same time because the total GPM demand would far exceed what your home can supply, resulting in weak streams that barely dribble out of the heads.
To map your zones, start by grouping your property into “hydrozones” based on plant types and environmental factors:
- Sun vs. Shade: Shady areas under mature trees in Torrance or Covina require far less water than wide-open lawns baking in the Southern California sun. Keep them on separate zones.
- Foliage Types: Never mix high-water turf grass with drought-tolerant shrubs or delicate garden flowers on the same zone.
- Sprinkler Head Types: Never mix different types of sprinkler heads (such as high-flow spray heads and low-flow rotors) on the same zone. Because they apply water at completely different rates, mixing them will leave one area drowned and another bone-dry.
When placing your sprinkler heads on your map, always design for head-to-head coverage. This means the spray from one sprinkler head must reach all the way to the base of the adjacent sprinkler heads. This 50% overlap ensures 100% uniform coverage, preventing dry spots and ensuring your lawn remains evenly green.
Step-by-Step Guide to Irrigation Installation
Once your design is complete and your zones are mapped, it is time to transition from paper to the soil. Installing a system is a physical, rewarding process, but it requires careful execution to avoid damaging your property or your back.
Preparing the Site for Irrigation Installation
Before you touch a shovel or rent a trenching machine, you must address safety and municipal regulations:
- Call 811 (Underground Service Alert): This is the absolute first step. In California, you must call 811 at least two working days before you dig. Utility crews will come to your property and mark the exact locations of underground gas, power, water, and cable lines. Hand-dig with extreme caution around these marked zones.
- Sod Removal: If you are installing a system in an existing lawn, use a flat spade or rent a sod cutter to slice off the top layer of grass in clean strips. Set these strips aside on a tarp and keep them moist so you can replant them once the trenches are filled.
- Keep Pipes Clean: As you lay out your pipes, cover the open ends with duct tape. This simple trick prevents dirt, rocks, or curious garden critters from entering the lines during assembly, saving you from clogged valves and ruined sprinkler heads later. For excellent visual tips on managing flexible lines, review the RaindripInstltnGuide_web .
Trenching and Pipe Laying for Irrigation Installation
With your layout marked on the ground using spray paint or string lines, you can begin digging.
- Trench Depth: For residential properties in Southern California, trench main lines (the pipes under constant pressure before the valves) to a depth of 10 to 12 inches. Lateral lines (the pipes after the valves that only hold water when watering) should be buried 6 to 8 inches deep. This depth keeps the pipes safe from aerators, shovels, and minor surface settling.
- PVC vs. Polyethylene Pipe:
- Schedule 40 PVC: This rigid, durable white pipe is the standard for main lines due to its high pressure rating. We connect PVC using purple primer and solvent cement, holding each joint firmly with a quarter-turn twist for 15 seconds to create a permanent chemical weld.
- Polyethylene (Poly) Pipe: This flexible black tubing is highly popular for lateral lines and drip systems because it can bend around obstacles, reducing the need for elbow fittings. We connect poly pipe using insert fittings and double-clamped stainless steel pinch clamps for maximum security.
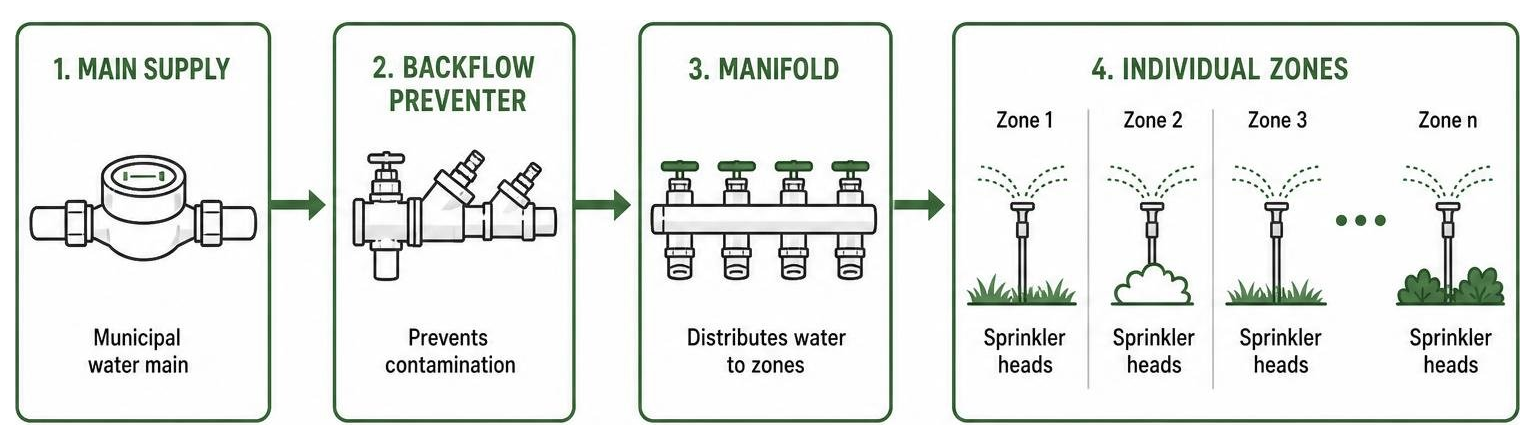
- Assembling Valve Manifolds: Your valves are the gatekeepers of your system. Group them together in an accessible, heavy-duty plastic valve box placed out of main foot-traffic areas. Leave at least 3 to 4 inches of space between each valve on your manifold. This extra space ensures that if a valve cracks or needs replacement years down the road, you can easily cut it out and glue in a new one without rebuilding the entire manifold.
If you are feeling overwhelmed by the sheer volume of tubing, fittings, and layout options for your garden beds, you can explore professional local support here: Don’t Drown in Options When Searching for Local Drip Repair.
Smart Controllers and Water-Saving Technology
The brain of your new irrigation installation is the controller. Traditional mechanical timers run on rigid schedules, watering your lawn rain or shine, which leads to massive water waste. In 2026, smart Wi-Fi controllers are the standard for modern landscapes.
These intelligent devices connect directly to your home’s Wi-Fi network to monitor real-time local weather reports. If rain is forecasted for your neighborhood in Torrance, Covina, or Harbor City, the controller automatically pauses your scheduled watering cycle.
Furthermore, smart controllers allow you to manage your entire system from your smartphone, create detailed water-usage reports, and set up “cycle-and-soak” programs. Cycle-and-soak is especially useful for clay soils; it breaks a long watering cycle into several short bursts with rest periods in between, allowing the water to fully absorb into the roots rather than running off into the street.
To see how these smart systems pay for themselves in water bill savings, take a look at our breakdown of local smart watering tech: Don’t Let Your Money Evaporate with These Torrance Smart Controllers.
Maintenance, Winterization, and Troubleshooting
Even the most advanced irrigation system requires regular attention to perform at its peak. Neglecting your system can turn a minor issue into a major, costly repair.
- System Flushing: Before you screw your brand-new sprinkler heads onto their risers for the first time, turn on the water manually at the valve for a few seconds. This flushes out any construction debris, dirt, or plastic shavings that fell into the pipes during installation.
- Winterization (Southern California Style): While we do not experience the deep, ground-freezing winters of northern climates, seasonal care is still vital. In late autumn, adjust your controller to account for cooler temperatures and winter rains. If you plan to shut the system down for the winter, drain the water from your backflow preventer to protect the brass assembly from occasional overnight frost in inland areas like Covina.
- Leak Detection and Clogged Heads: Walk your system once a month while it is running. Look for sprinkler heads that fail to pop up fully, heads that mist excessively (a sign of too much pressure), or bubbling pools of water along pipe runs that indicate an underground leak. If a head is spraying unevenly, unscrew the top, pull out the plastic filter basket, rinse away any trapped sand, and screw it back on.
If you are a hands-on homeowner who enjoys managing your own yard projects, we have put together a comprehensive, easy-to-follow guide to help you tackle basic fixes: Sprinkler Repair Quick and Easy: A DIY Guide.
Frequently Asked Questions About Irrigation Systems
How much does a new sprinkler system cost?
The cost of a new irrigation installation depends heavily on your property’s size, the number of zones, soil conditions, and the quality of components used.
For a professional, fully automated residential sprinkler system in Southern California, costs typically range from $3,000 to $8,000. While this is a significant upfront investment, a properly designed system can save you $300 to $800 annually on water bills while adding thousands of dollars to your home’s curb appeal and overall property value.
If you are looking to install a simple DIY drip irrigation system for a small garden bed, you can get started with a high-quality starter kit and a basic hose-bib timer for around $75 to $150. For a deeper look at what goes into these numbers, read our detailed cost guide: The Ballpark Cost of a New Sprinkler System Don’t Get Soaked by Hidden Fees.
Should I choose DIY or hire a professional installer?
If you enjoy physical labor, have a few free weekends, and are installing a simple drip system or a small, single-zone lawn sprinkler, DIY can be a highly rewarding way to save on labor costs.
However, for large properties, multi-zone setups, or complex landscapes with varying elevations, hiring a professional is highly recommended. Professional installers have specialized machinery—like vibratory plows that pull pipe underground with minimal damage to your existing lawn—and the hydraulic expertise to design a system that operates at peak efficiency.
If you decide to hire a contractor, make sure to ask these essential questions:
- Are you licensed, bonded, and insured in the state of California?
- Do you handle all local permitting and municipal backflow prevention filings?
- What brand of components do you use, and what warranties do you offer on labor and parts?
- Will you provide a detailed zone map and hands-on training for the controller after installation?
To help you find the right local experts who know the exact soil and climate conditions of the South Bay and surrounding areas, take a look at our regional directory: Rain Bird Rescue: Finding Certified Repair Experts Nearby.
How often should my backflow preventer be tested?
In almost every Southern California municipality, including Torrance, Covina, and Harbor City, you are legally required to install a backflow preventer on any irrigation system connected to the municipal water supply. This device prevents contaminated water (containing fertilizers, pesticides, and animal waste) from siphoning backward into your home’s clean drinking water.
Because these devices are critical for public health, local water districts require them to be tested annually by a certified backflow tester. The tester will verify that the internal check valves and relief valves are opening and closing at the correct pressures, and they will submit the official compliance reports directly to your local utility department on your behalf.
Conclusion
A beautiful, thriving Southern California landscape starts from the ground up. Investing in a professional irrigation installation is the single best way to protect your plants, conserve our region’s precious water resources, and reclaim your free time on the weekends.
At Southern California Tree & Landscape, we have been family-owned and operated right here in Southern California since 1991. Our experienced, highly trained crews specialize in custom landscape design, precision irrigation installation, and comprehensive maintenance services designed to thrive in our unique coastal and inland climates. With an ISA-certified arborist on staff and a reputation for rapid emergency response, we build systems that are efficient, durable, and perfectly tailored to your property’s unique needs.
Whether you are looking to design a brand-new system for a new home, upgrade an outdated setup to smart Wi-Fi technology, or need reliable repairs, we are here to help. You can explore our wide range of services on Our Services page, read more about our water-saving irrigation philosophies at Irrigation Services: A Smart Solution for Your Landscape, or contact us directly to schedule your custom design consultation at Our Services – Irrigation. Let’s work together to build a smarter, greener, and more sustainable outdoor oasis for your home!
Local Southern California Resources & Water Conservation Guidelines
For additional local support, regional watering schedules, and water conservation guidelines in your specific neighborhood, you can explore these trusted public resources:
- For water conservation tips and rebate programs in the South Bay, visit the Be Water Wise Southern California portal.
- To check local watering restrictions and municipal guidelines in Torrance, see the City of Torrance Water Services page.
- For residents in the East San Gabriel Valley, review the City of Covina Water Utility Division for local conservation schedules and updates.