
Start Vertical Garden Installation With a Secure, Water-Smart Plan
A successful vertical garden installation starts with four basics: choose a system that fits the wall and available light, mount it into solid structure, add a waterproof barrier and drainage path, then test irrigation before planting. Pocket planters work well for small herb or succulent displays, modular panels offer easier expansion, and hydroponic systems suit owners prepared to manage pumps, nutrients, and water quality.
For Southern California properties, prioritize heat-tolerant plants, drip irrigation with a timer, and enough air space behind the garden to protect the wall. A well-planned living wall can turn a narrow patio, entry, balcony, or courtyard into usable green space without giving up valuable ground area.
I am Troy Basmajian, President of Southern California Tree & Landscape, and I work with property owners and managers across Southern California on landscape design, irrigation, and long-term exterior care. This experience informs a practical approach to vertical garden installation: build for secure mounting, efficient water use, healthy plants, and dependable maintenance.
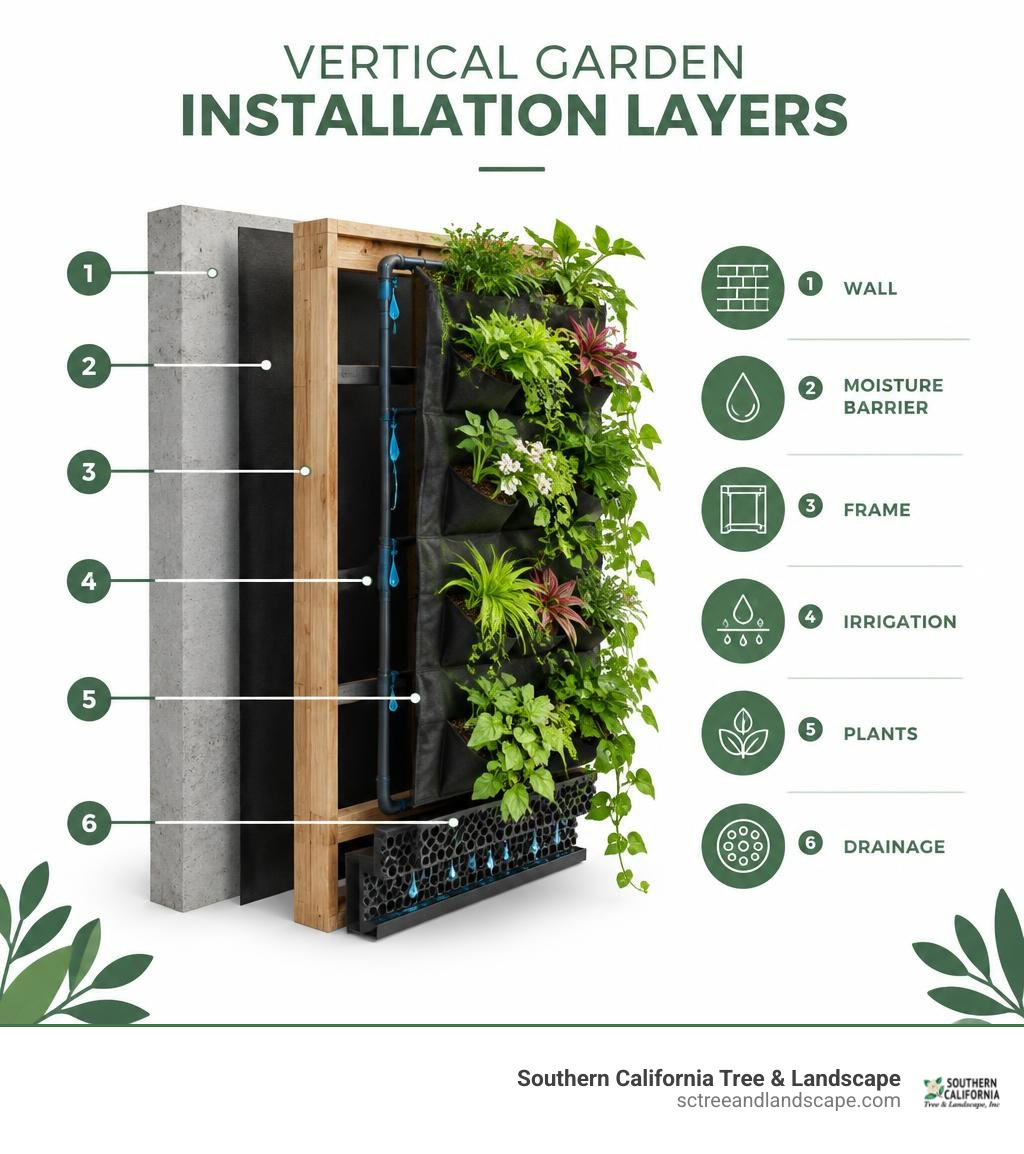
Key vertical garden installation vocabulary:
Choosing the Right Vertical Garden System for Your Space
Selecting the right living wall structure comes down to evaluating three critical factors: available structural weight capacity, daily sunlight exposure, and how much hands-on maintenance you want to perform. A fully saturated green wall carrying soil and mature foliage places significant loads on your structure. Understanding the mechanics of each setup ensures your wall stays secure while keeping your greenery vibrant throughout our dry Mediterranean summers.
| System Type | Typical Hardware Cost | Growing Medium | Water Requirements | Best Use Case |
|---|---|---|---|---|
| Pocket Planters | $50 – $150 | Peat-free mix, coconut coir | Low to moderate (drip or hand water) | Compact herb gardens, balconies, decorative annuals |
| Modular Panels | $100 – $300 | Lightweight soil blend with perlite | Moderate (automated pressure-regulated drip) | Exterior patio feature walls, lush perennial displays |
| Hydroponic Towers / Channels | ~$200+ | Expanded clay, rockwool, or water only | High circulation (~10 GPH per sq ft) | Fast-turn leafy greens, modern indoor living walls |
When assessing light, North- and West-facing exterior walls in places like Torrance, Harbor City, and Covina capture intense afternoon heat and light. Positioning soft-leafed foliage on a scorching west-facing stucco wall without shade protection can quickly stress delicate roots.
DIY Pocket and Modular Panel Systems
Breathable felt pockets and modular panel frames are popular options for residential backyards and urban spaces. A standard modular vertical garden panel measuring 24×36 inches effectively turns 8 square feet of bare wall surface into up to 32 square feet of lush planting area.
Because each standard panel typically accommodates 4 to 6 plants depending on root depth, you can build impressive density without overloading the framing. Building your own wooden frame out of naturally rot-resistant cedar or redwood keeps the assembly lightweight—cedar is roughly 30% lighter than pressure-treated lumber—while allowing you to expand your system panel by panel over time. If you are exploring custom dimensions, reviewing guides on how to build DIY modular garden wall panels can help you plan your initial cuts and bracket spacing.
Hydroponic Vertical Garden Installation Options
Hydroponic vertical gardens eliminate traditional soil entirely, relying instead on nutrient-rich water circulating continuously through modular channels, net pots, or inert media like expanded clay pebbles. For growers wanting rapid vegetative growth for culinary greens, strawberries, or indoor biophilic displays, hydroponics offers incredible nutrient uptake.
Hydroponic setups typically require a water flow rate of approximately 10 gallons per hour for every square foot of growing area. To keep plants thriving, maintain your reservoir water pH strictly between 6.0 and 6.5.
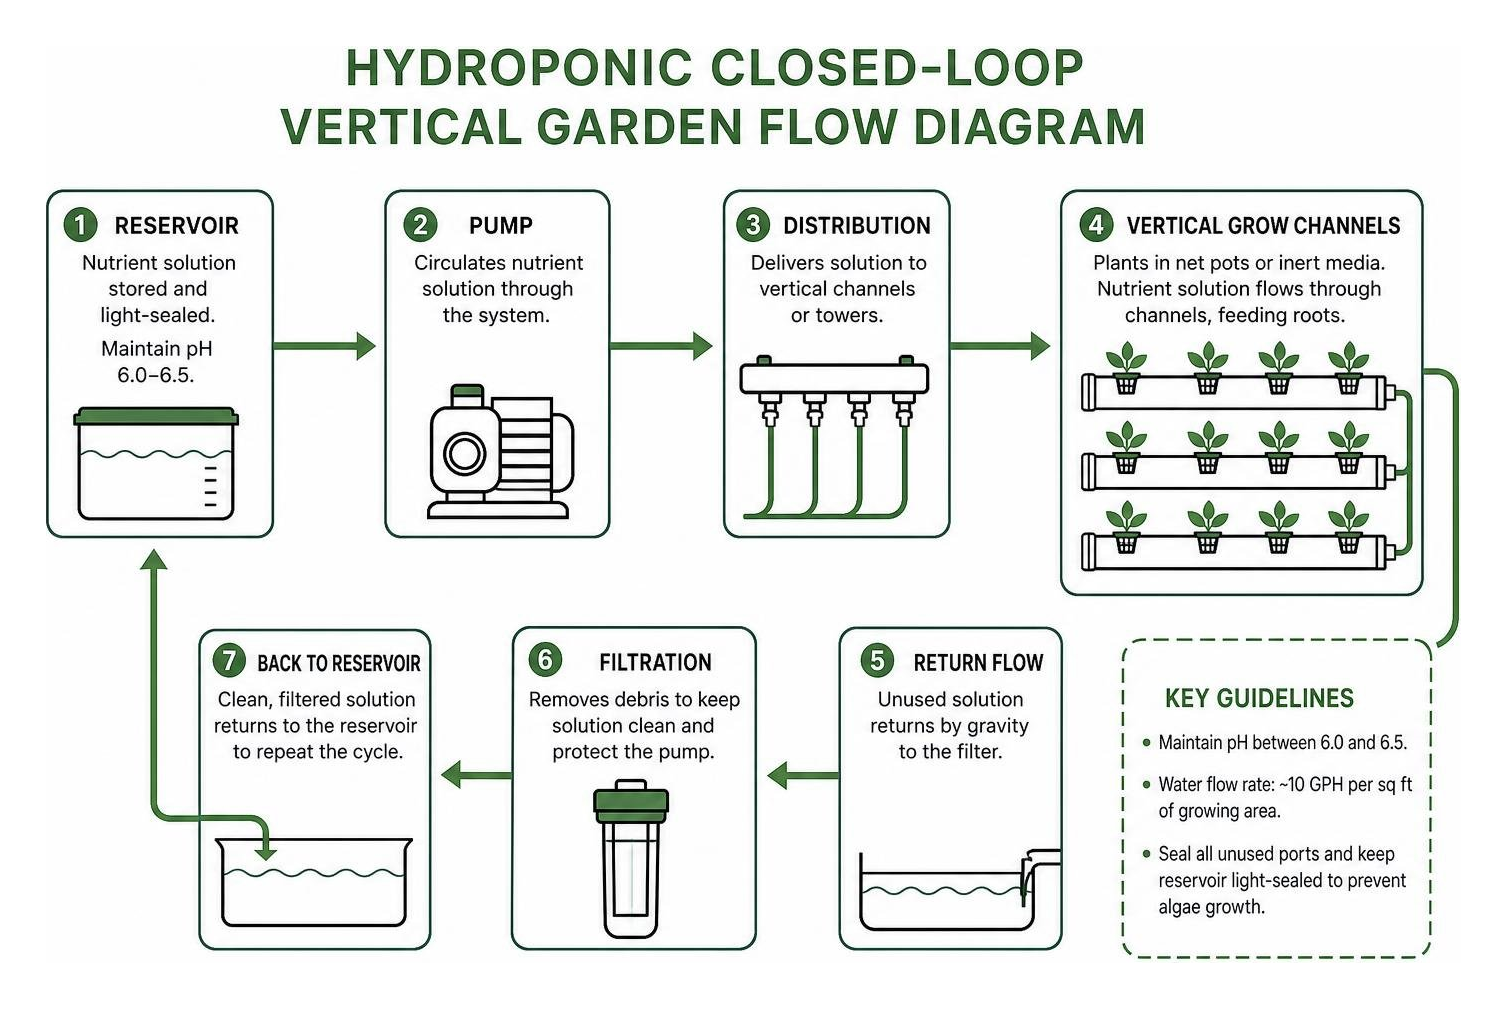
A constant challenge in outdoor hydroponics is algae growth. Ensure every unused port is sealed with a blank cover or grow cup, and keep your primary reservoir completely light-sealed. As roots expand, schedule regular channel inspections to ensure vigorous root systems do not create internal dams that cause overflow.
Essential Tools, Materials, and Wall Preparation

Before driving a single screw into an exterior wall, gather high-quality materials rated for exterior load-bearing performance. High-moisture environments require corrosion-resistant hardware like stainless steel or coated exterior fasteners.
- Core Tools: Heavy-duty cordless drill/driver, 4-foot bubble level, chalk line, stud finder, measuring tape, and masonry drill bits (typically 6.5 mm for brick/concrete anchors).
- Structural Lumber: Kiln-dried 1×4 cedar or aluminum mounting rails.
- Fasteners: Heavy-duty exterior timber screws for wood studs, toggle bolts for interior drywall assemblies, or masonry sleeve anchors for concrete block and stucco.
- Protection & Plumbing: 40-mil waterproof poly membrane or PVC backing board, micro-drip irrigation kit, pressure regulator, filter, and collection drip trays.
Planning a larger yard transformation alongside your living wall? Integrating custom vertical structures with outdoor landscape design and installation ensures all your outdoor features feel cohesive and balanced.
Structural Mounting and Wall Surface Anchoring
A standard vertical garden saturated with water can easily weigh 15 to 30 pounds per square foot. Never anchor a substantial living wall directly into unsupported drywall or thin exterior siding.
When mounting to wood-framed walls, secure your mounting brackets or vertical furring strips directly into wall studs spaced 16 or 24 inches on center. For solid brick, poured concrete, or CMU block walls common across Southern California properties, pre-drill your pilot holes using a masonry bit and drive in rated mechanical screw anchors. Never rely on construction adhesives alone to hold vertical planters.
Moisture Barriers and Wall Protection
Uncontrolled moisture trapped behind a living wall will degrade wood siding, rot stucco underlayment, and breed mold. Wall protection requires two defensive layers: an impervious moisture barrier and a continuous air gap.
Fasten an exterior-grade waterproof membrane (such as heavy-duty pond liner or high-density PVC sheeting) directly behind the footprint of your planting installation. Mount your panel brackets onto vertical furring strips rather than flush against the home’s exterior. This creates a minimum 3/4-inch to 1-inch rear air gap that lets moisture evaporate freely, safeguarding your home’s structural framing.
Step-by-Step Vertical Garden Installation Guide
Achieving professional results requires a methodical installation sequence. Taking the time to properly measure, level, and secure every component prevents alignment headaches later on. If you are comparing installation methodologies across complex residential projects, reading a comprehensive guide to landscape installation will give you a clear perspective on site prep and workflow management.
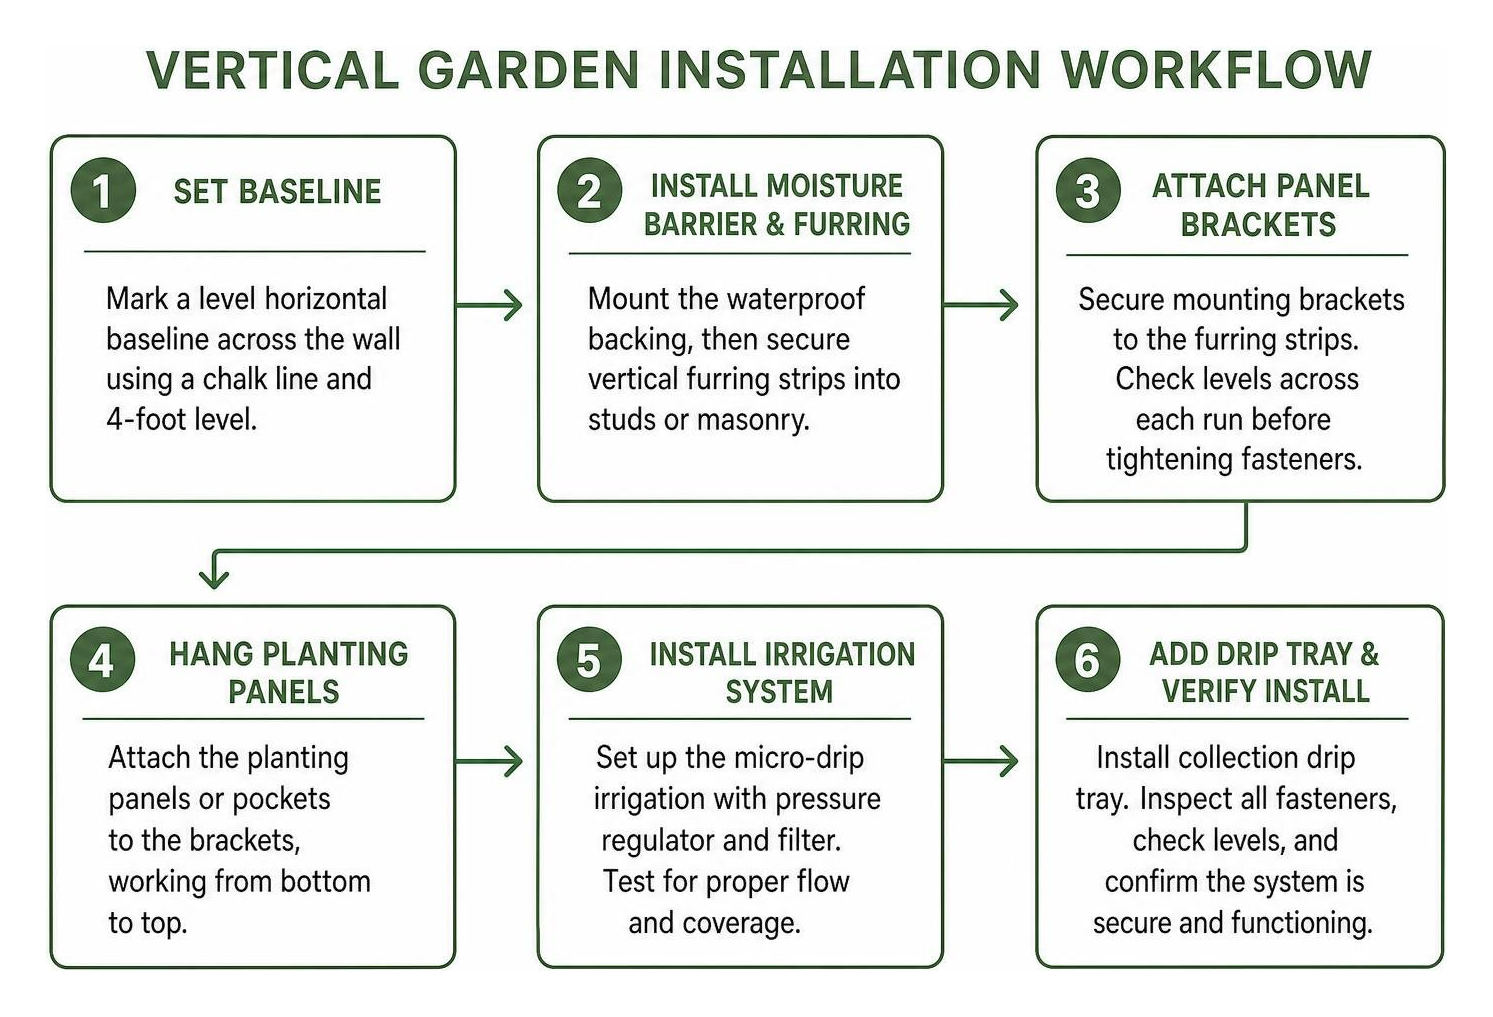
Commercial living wall systems typically require about 0.33 man-hours per square foot to install when properly staged. By following this sequential assembly process, you can maintain efficient progress across your project:
Pre-Assembling Frame and Modular Kits
- Snap Your Baselines: Mark a level horizontal reference line across your wall using a chalk line and 4-foot level. This establishes your bottom baseline.
- Mount Furring Strips and Moisture Barrier: Secure your waterproof backing against the wall surface, followed by your vertical cedar or metal furring strips anchored securely into structural studs or masonry.
- Attach Panel Brackets: Secure the system’s mounting brackets along the furring strips. Check every bracket run with your level before tightening down fasteners; minor initial leveling errors compound as you build upward. If you are assembling manufactured kits, consult the GLOSSARY CONTENT LIST or manufacturer documentation to confirm specific clip orientations.
- Pre-Plumb Delivery Tubing: Route your main 1/2-inch or 1/4-inch irrigation supply lines vertically along the furring channels before locking planter bodies in place, hiding unsightly tubing behind the plant line.
Finalizing Your Vertical Garden Installation and Planting
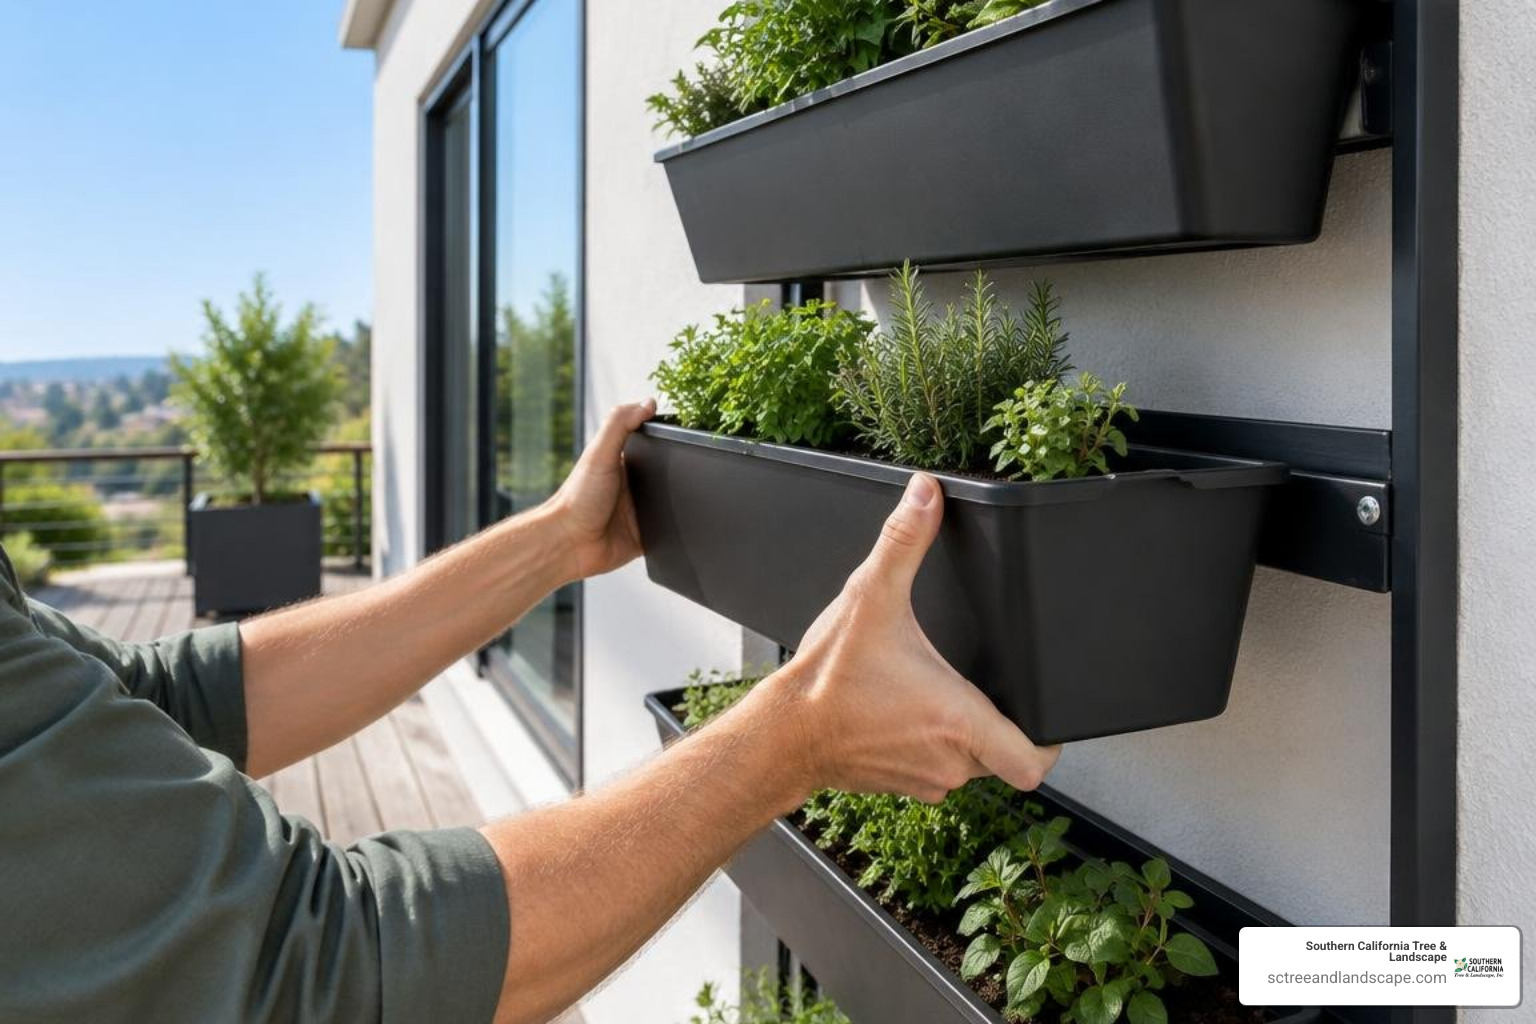
Once your frame, backing, and supply tubing are locked in, mount your modular planters onto the frame rails. For step-by-step guidance on securing modular hardware, follow how to install a vertical garden system easily to ensure every module clicks securely into place.
When potting your plants:
- Pre-Pot on a Flat Bench: Working at waist height on a potting table is far easier than trying to fill empty pockets while balancing on a ladder.
- Arrange by Habit: Place upright, structured foliage (like dwarf culinary sage or ferns) in the upper levels, and position cascading varieties (such as trailing rosemary, ivy, or sedum) in lower tiers where they can drape naturally.
- Firm Root Balls Gently: Ensure root balls make complete contact with surrounding growing medium to prevent dry air pockets around delicate feeder roots.
- Slot and Saturate: Click each pre-potted container into its designated bracket, verify drain hole clearance, and run an initial deep hand-watering cycle to settle the soil before turning on your automated system.
Setting Up Efficient Irrigation and Drainage Systems
Hand-watering a living wall quickly becomes tedious, and uneven moisture distribution is the top reason vertical plants struggle. A purpose-built drip irrigation layout provides consistent, automated hydration directly to root zones with minimal water waste. If you are upgrading an existing yard supply line to feed a vertical wall, integrating efficient drip irrigation services guarantees reliable pressure and backflow compliance from day one.
Commercial-grade systems, such as those detailed in the LiveWall Vertical Plant Wall System installation guide, require irrigation feeds running between 25 and 85 PSI, with each automated zone valve requiring 8 to 10 gallons per minute (GPM) regulated down to roughly 15 PSI for standard emitter operation.
Automated Drip Lines and Pressure Regulation
For residential installations, tap into a dedicated hose bib or landscape riser equipped with an anti-siphon backflow preventer, a 150-mesh disc filter, and a 25 PSI pressure regulator.
Run 1/2-inch poly tubing as your primary supply line, branching out with 1/4-inch micro-tubing to individual planter pockets. Use pressure-compensating (PC) drip emitters delivering 0.5 to 1.0 gallon per hour. Pressure-compensating emitters feature internal diaphragms that deliver identical volumes of water regardless of whether a planter sits at the top of an eight-foot wall or on the bottom row.
For compact setups, systems like the DIG Living Wall Vertical Garden Kit allow expansion up to 65 pots using 1/4-inch micro tubing connected to a standard faucet timer.
Catchment Trays and Drainage Routing
Every vertical garden produces some drainage runoff. Leaving runoff unmanaged can stain patio concrete or rot underlying deck framing.
Install a continuous aluminum or rigid plastic drip tray directly beneath the lowest tier of planter boxes. Slope this gutter slightly toward a dedicated drainage pipe that discharges into an adjacent landscape bed, gravel french drain, or storm catchment basin.
For indoor or patio installations, direct the catchment outlet into a collection reservoir equipped with a small float pump to recirculate water, or empty the tray manually after irrigation cycles.
Plant Selection, Growing Media, and Ongoing Care
A vertical garden’s root volume is confined compared to traditional garden beds. As a result, plant selection and lightweight growing media are essential for long-term health. If you are unsure which plant varieties match your property’s specific microclimates, partnering with professional landscape consultants will help you select resilient, climate-appropriate species.
Best Foliage, Edibles, and Soil Blends
Avoid heavy topsoil or straight backyard dirt, which compacts tightly in vertical containers and suffocates root systems. Use a loose, aerated, peat-free potting blend:
- Base Blend: 50% premium coconut coir (for moisture retention and structural loft), 30% perlite or pumice (to ensure rapid drainage and airflow), and 20% organic compost or worm castings.
- Culinary Edibles: Genovese basil, thyme, mint (contained individually so roots don’t invade nearby plants), chives, strawberries, loose-leaf lettuces, and dwarf peppers.
- Ornamentals & Succulents: Sedum varieties, Echeveria, trailing jade, asparagus fern, Heuchera, pothos (for shaded courtyards), and trailing rosemary.
Maintenance Routines and Troubleshooting
Keep your living wall thriving by setting up a consistent maintenance routine:
- Weekly Checks: Scratch the top inch of potting soil in both upper and lower rows to verify even moisture. Look for signs of insect pests like aphids, spider mites, or mealybugs on the undersides of leaves.
- Monthly Pruning & Feeding: Trim back aggressive growers to keep them from shading out smaller neighbors. Feed with a mild, water-soluble organic liquid kelp and fish emulsion blend every 2 to 4 weeks during the active growing season.
- Quarterly System Flush: Remove the end caps on your drip lines and open the valve for 60 seconds to flush out mineral scale and sediment that could clog emitters.
- Annual Overhaul: In late winter or early spring, trim back dense, woody root systems to encourage fresh growth, top-dress pockets with fresh compost, and check the tightness of all mounting hardware.
For specialized hydroponic tower designs, consult assembly resources such as building up the green wall and vertical garden system kit to master root trimming and pump descaling intervals.
Frequently Asked Questions About Vertical Gardens
How much does a vertical garden installation typically cost?
A small DIY felt pocket setup on an existing patio fence can cost as little as $50 to $150. Manufactured modular panel kits for a standard patio wall generally range between $100 and $300 per panel segment, while automated hydroponic systems start around $200 and scale upward based on pump and lighting capacity.
Building your own modular cedar panel frames typically costs less than half the price of pre-fabricated commercial panels, though professional installation ensures structural longevity and plumbing protection for higher-end home features.
How often should a vertical garden irrigation system run?
Because vertical planters contain modest soil volumes that dry out faster than in-ground beds, run your automated drip system for shorter, more frequent intervals rather than one long soak.
In Southern California’s warmer months, program your tap timer for 2 to 3 short cycles per day (typically 3 to 5 minutes per cycle depending on your emitter flow rate). During cooler, overcast winter months, reduce watering to once daily or every other day, always confirming soil moisture by touch before adjusting timers.
How do I protect indoor or outdoor walls from water damage?
Always install a waterproof poly or PVC membrane backing behind your vertical garden assembly. Mount the garden framework onto vertical furring strips to preserve a continuous 1-inch air gap between the backing and your building’s wall surface.
Finally, ensure an adequately sized drip catchment tray sits below the lowest planting tier to carry excess drainage away from your home’s foundation or patio surface.
Conclusion
A well-designed vertical garden brings vibrant plant life into any urban space, transforming plain patio walls, courtyards, and balconies into beautiful green retreats. When you anchor your structure securely, build in a reliable moisture barrier, and automate your drip irrigation, your living wall will stay lush and healthy season after season.
At Southern California Tree & Landscape, our family-owned team has helped homeowners and property managers across the South Bay, Torrance, Harbor City, and Covina elevate their outdoor spaces since 1991. Whether you want a compact culinary herb wall or a full residential landscape makeover, explore our guide to backyard oasis design in Torrance to see how custom living walls and creative landscape design can bring your dream outdoor living space to life.